


Configuring Passwords on a Router: Console, Telnet, AUX & Enable
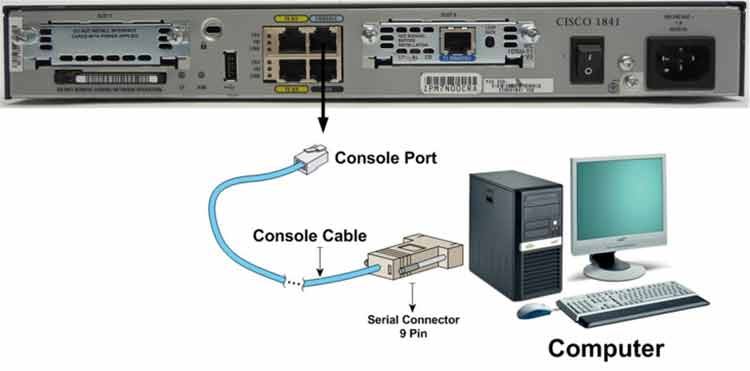
Lab Objective
- Configure a password for User Mode access
- Configure a password for Telnet access
- Configure a password for Auxiliary access
- Configure a password for Privilege Mode access
- View router configuration in RAM
🛠️ Equipment Needed for This Lab
- 1 Cisco router
- 1 PC with PuTTY installed
- Console cable (rollover cable)
Step 1: Connect to the Router and Enter User Mode
Connect to the router through PuTTY and enter User Mode. What do you see at the command prompt?
If you see the prompt below, you’ve successfully entered User Mode. If not, check the console cable connection between the router and PC.
Router>
Step 2: Understanding Cisco Password Types
Cisco routers and switches support five password types:
- Console Password
- Telnet (VTY) Password
- Auxiliary Password
- Enable Password
- Enable Secret Password
Console, Telnet (VTY), and Auxiliary passwords control access to User Mode through those three access methods — they block unauthorized users from reaching User Mode.
Enable Password and Enable Secret control access to Privilege Mode. When a user types enable from User Mode, the router prompts for one of these passwords.
Password Types at a Glance
| Password Type | Controls Access To | Configuration Mode |
|---|---|---|
| Console Password | User Mode via Console | line console 0 |
| Telnet (VTY) Password | User Mode via Telnet | line vty 0 15 |
| Auxiliary Password | User Mode via AUX | line aux 0 |
| Enable Password | Privilege Mode | enable password |
| Enable Secret | Privilege Mode (encrypted) | enable secret |
Step 3: Set the Console Password
This step configures a password for User Mode access through the Console port. The commands below show how to set the Console password.
| Command | Description |
|---|---|
| Router(config)#line console 0 | Enters Console port configuration mode. |
| Router(config-line)#password CCNA | Sets CCNA as the Console password. |
| Router(config-line)#login | Enables the password prompt when entering User Mode through Console 0. |
Router(config)#line console 0
Router(config-line)#password CCNA
Router(config-line)#login
Set the Telnet (VTY) Password
The commands below show how to set the Telnet password. In this example, vty 0 15 supports 16 simultaneous Telnet connections — numbered 0 through 15. Your equipment may support more.
| Command | Description |
|---|---|
| Router(config)#line vty 0 15 | Enters Telnet (VTY) configuration mode for 16 simultaneous connections (0–15). |
| Router(config-line)#password CCNA | Sets CCNA as the Telnet password. |
| Router(config-line)#login | Enables the password prompt when entering User Mode through Telnet. |
Router(config)#line vty 0 15
Router(config-line)#password CCNA
Router(config-line)#login
Important: To access the router through Telnet, you must also configure a password for Privilege Mode. Without it, you can’t reach Privilege Mode via Telnet. We’ll configure that later in this lab.
Set the Auxiliary (AUX) Password
The commands below show how to set the AUX password.
| Command | Description |
|---|---|
| Router(config)#line aux 0 | Enters AUX port configuration mode. |
| Router(config-line)#password CCNA | Sets CCNA as the AUX password. |
| Router(config-line)#login | Enables the password prompt when entering User Mode through AUX 0. |
Router(config)#line aux 0
Router(config-line)#password CCNA
Router(config-line)#login
Step 4: Set the Enable Password and Enable Secret
Enable Password and Enable Secret both protect Privilege Mode. When a user types enable from User Mode, the router prompts for one of these passwords.
Key difference: Enable Secret is stronger and more secure than Enable Password. If you configure both, Enable Secret takes effect.
Password flexibility: Console, Telnet, and AUX passwords can be the same or different — your choice.
Configuring passwords on the router blocks unauthorized users from reaching Privilege Mode.
| Command | Description |
|---|---|
| Router(config)#enable password CCNA | Sets CCNA as the Enable Password. |
| Router(config)#enable secret CCNP | Sets CCNP as the Enable Secret. |
Router(config)#enable password CCNA
Router(config)#enable secret CCNP
Step 5: View Router Configuration in RAM
Use the show running-config command to display the active configuration stored in RAM.
Router#show running-config
Study the output carefully and answer these questions:
- What appears next to
enable secretin the output? - What appears next to
enable passwordin the output? - Which password is not shown in plain text — meaning it’s encrypted? Write down your observations.
Screenshot: show running-config output showing enable secret (encrypted) and enable password (plain text) — appears here.
Enable Password vs. Enable Secret
| Feature | Enable Password | Enable Secret |
|---|---|---|
| Encryption | Plain text or weak encryption | Strong MD5 hash |
| Security | Lower | Higher |
| Visible in running-config | Yes (plain text) | No (encrypted) |
| Precedence | Overridden by Enable Secret | Takes effect when both are set |
| Recommended? | No | Yes |
Best practice: Always use enable secret instead of enable password. The secret is hashed and never appears in plain text.
Full Command Reference
| Command | Description |
|---|---|
| Router(config)#line console 0 | Enters Console port configuration mode. |
| Router(config-line)#password CCNA | Sets CCNA as the Console password. |
| Router(config-line)#login | Enables the password prompt on the line. |
| Router(config)#line vty 0 15 | Enters Telnet (VTY) configuration mode for 16 connections. |
| Router(config-line)#password CCNA | Sets CCNA as the Telnet password. |
| Router(config)#line aux 0 | Enters AUX port configuration mode. |
| Router(config-line)#password CCNA | Sets CCNA as the AUX password. |
| Router(config)#enable password CCNA | Sets CCNA as the Enable Password. |
| Router(config)#enable secret CCNP | Sets CCNP as the Enable Secret (encrypted). |
| Router#show running-config | Displays the active configuration in RAM. |
✅ Key Takeaways
- Cisco supports five password types: Console, Telnet (VTY), AUX, Enable, and Enable Secret.
- Console, Telnet, and AUX passwords protect User Mode access through those methods.
- Enable Password and Enable Secret protect Privilege Mode.
- Enable Secret is encrypted with a strong hash — it never appears in plain text.
- Enable Password shows in plain text in
show running-config. - If both enable passwords are set, Enable Secret wins.
- Console, Telnet, and AUX passwords can be the same or different.
- Always use
enable secretfor better security.
